Windows Help Center

Your One Stop Blog for all Windows XP and VISTA tricks,tweaks ,hacks and much more.

Followers

Ads By Google

1000 Awesome Things About India

Blog Stats

recent Tricks

Ads By Google

Link Unit By Google

Categories

Register for Free

Google Search

Showing posts with label install. Show all posts

First thing you need is to download the Desktop install ISO from the Ubuntu site (http://www.ubuntu.com). You can skip right to the download mirrors page at http://www.ubuntu.com/getubuntu/downloadmirrors if you want to save a few mouse clicks.

Once you get it downloaded fire up Virtual PC, and create a new machine. If you are not familiar with VPC, see my step by step instructions for creating a machine at http://arcanecode.wordpress.com/2006/09/20/virtual-pc-step-by-step/ Make sure to pick “other” as the OS type. I used 512 meg of ram because my system has 2 gig, but if you have less you can get away with 256 meg of ram for the Ubuntu Virtual machine.

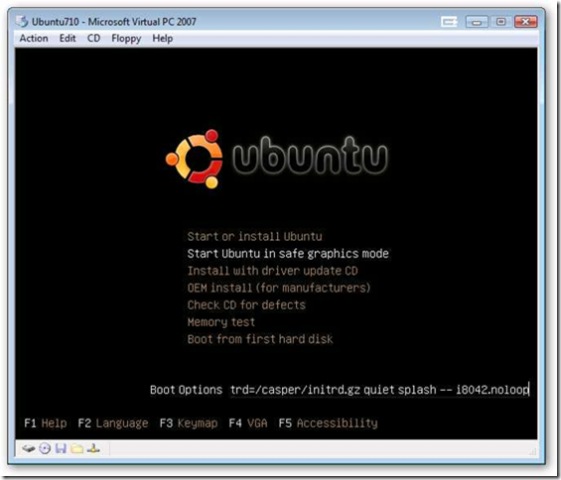
Fire up your new virtual machine, and use the option in the CD menu to “Capture ISO image”. Point the image at the desktop iso you just downloaded.When it starts, immediately press the down arrow, so that “Start Ubuntu in Safe Graphics Mode” is highlighted.

When 7.04 was released, the new kernel had issues with the mouse emulated by Virtual PC. To be blunt, the mouse just didn’t work. However, several work arounds were found. The easiest was brought to my attention via comments on the blog, the i8042.noloop option. That’s what we’ll implement, so we can use the mouse during the “live mode”.

Hit the F6 key, for Options. When the line appears, at the very end type in a space (if there’s not one after the two dashes) then i8042.noloop . Your screen should look something like this:

u710_001

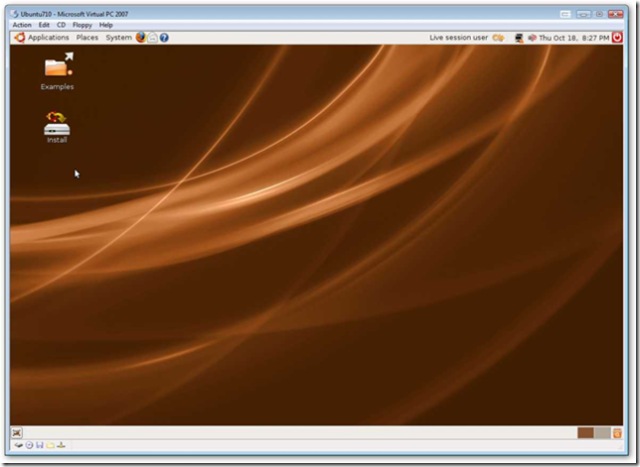
Press Enter to start the launch process. Be patient, it takes quite a while. Once it’s finally up though, you’ll see this screen:

u710_002

Double click on the Install icon to begin the install.

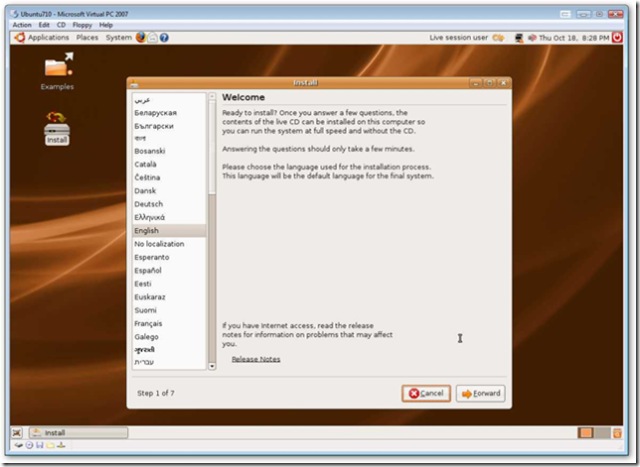
On the first screen, below, you are welcomed and asked about a language. Pick your language and hit Forward.

u710_003

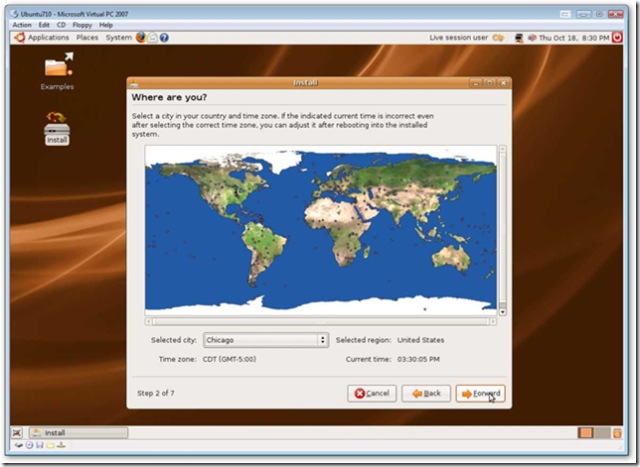
Now pick your time zone, since I’m in the Central zone I picked Chicago as a city in my time zone and clicked Forward.

u710_004

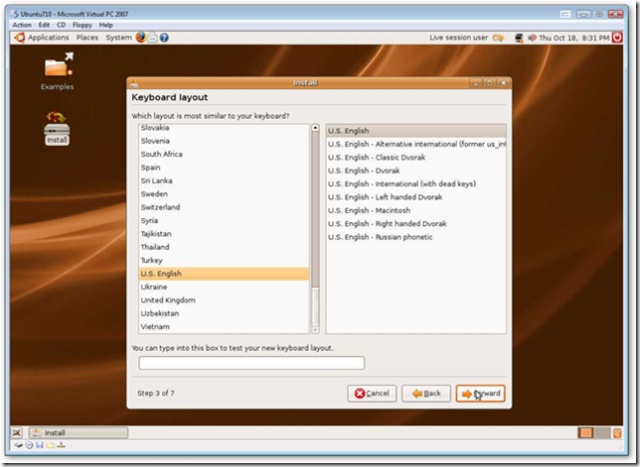
No it asks about keyboard layout, pick your keyboard if yours isn’t US English, then press Forward.

u710_005

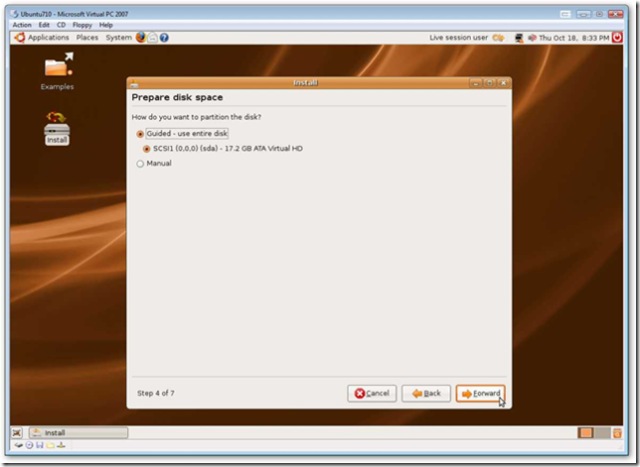
Ubuntu will crank and grind for a minute, then you’ll see this dialog asking about your disks. Just take the defaults and click Forward.

u710_006

Time for a little personal info, give your name, a login id, enter the password you want to use, and what you want to name the “computer”. When done click Forward.

u710_007

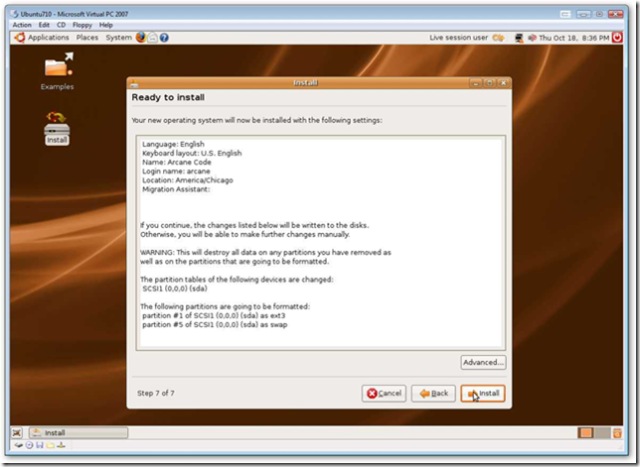
OK, you’re almost ready to start the install process. Look this over, if everything looks good just press the Install button and we’re off to the races.

u710_008

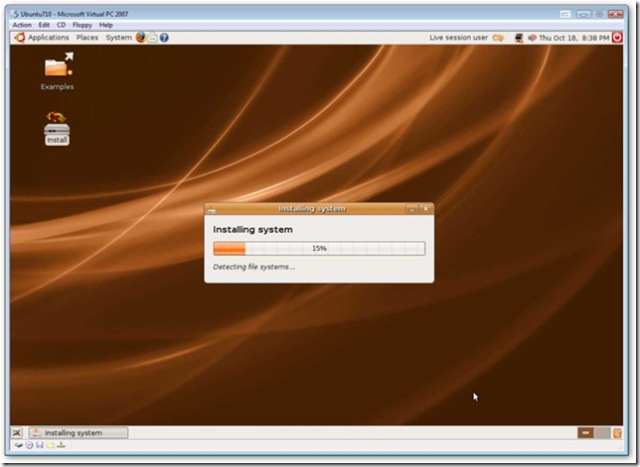
Did I say races? Well, turtle race might be more like it, the install runs pretty slow, so get some coffee, or maybe a second bowl of ice cream if you’re doing a late night install.

u710_009

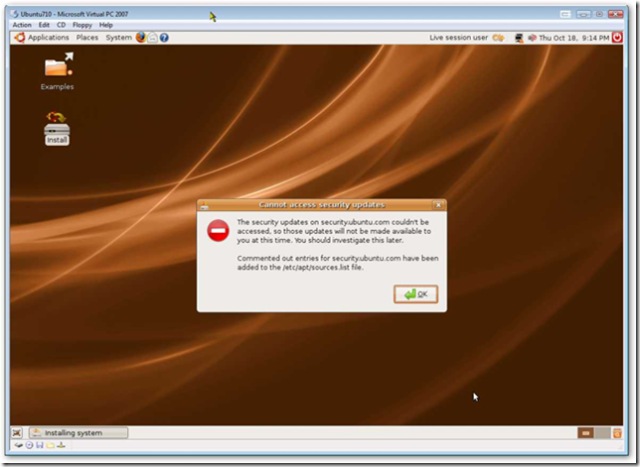
I did encounter one error during the install. You may see this as well, but you can go back later and correct this through the normal updates process.

u710_010

Now Ubuntu will finish, and ask if we want to reboot. Tell it no, then reboot by shutting down by pressing the red shut down icon in the very upper right of the Ubuntu window.

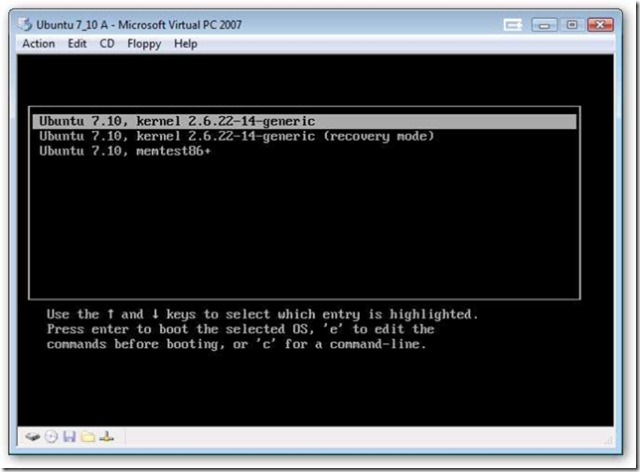
OK, you’ll have to be very quick with this next step. Remember the mouse issue? We’ll still need to fix it. First, boot the new machine, after clicking on CD and releasing the ISO if it’s still held. Now when you see the words “Grub loader” hit the Escape key. If you were fast enough, you’ll see this screen.

u710_012

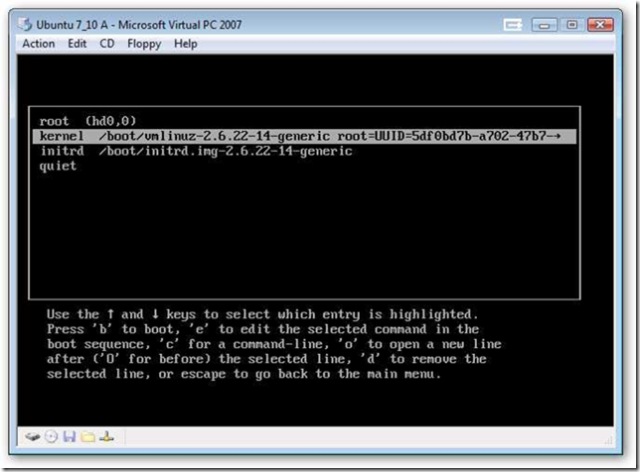
With the line you see selected, press the “e” to edit the line. Now a new screen will appear.

u710_013

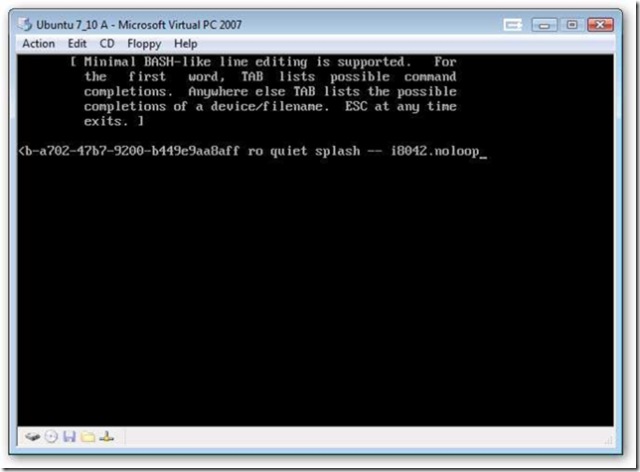
Move the highlight down one to the Kernal line, and press “e” to edit that line. When the new screen appears, you’ll need to add two dashes, then the i8042.noloop command. Your screen should look like this:

u710_014

Press Enter, then when you are returned to the screen with “kernel…” on it, make sure the kernel line is still highlighted and press b to boot.

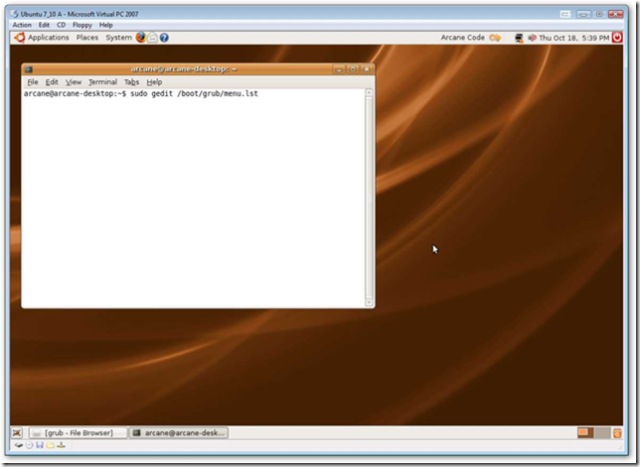
Once booted, login using your user id and password. When Unbuntu is up, it’s time to fix the mouse issue once and for all. Click on Applications, Accessories, Terminal. When the terminal window appears, type in:

sudo gedit /boot/grub/menu.lst

u710_015

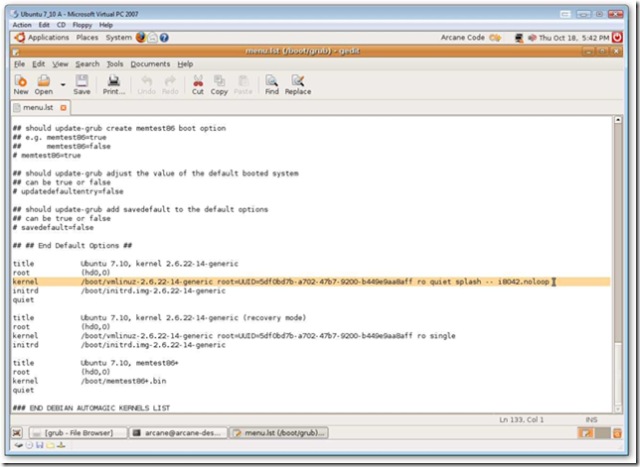
When you press Enter you’ll be prompted for your password, enter it. An editor should appear. Scroll down to the very bottom of the text and find the line that begins with “kernel”. Add the – i8042.noloop to the end of the line, as I’ve shown below. (Note I have highlighted the line to make it easy to see, yours won’t be normally highlighted in your session.)

u710_016

Save the file and exit the editor and the terminal window. When you next reboot, you should be able to just login normally, and the mouse should work.

And there you go, Ubuntu 7.10 up and running, complete with mouse, under Virtual PC 2007.


My sincere thanks to Arcane Code Blog.


Well, this is specially for people who recently invested thousand of bucks on branded laptops and desktops with VISTA preinstalled and now cant' run many of their older softwares (like Oracle and many more...).

So here is the way to dual boot Windows VISTA and Windows XP on a PC with VISTA preinstalled.

Step 1 - Partition the Drive:
Vista comes with a nice partitioning tool, so i'll be using it instead of partition magic this time around.
-right-click computer under the start menu and choose "manage"


-right-click the drive you want to partition, and select "Shrink Partition"
-The amount you shrink the partition is the amount of space used for the XP partition, so i would suggest making it at least 3-4GB in size, as a full XP installation will take 1.5GB on it's own.

-now right-click the unallocated memory and select new basic partition.


-Choose NTFS file system, this will save formatting before installation.
-name the drive anything you like, i chose "XP"
-click next on the rest of the screens and finish.

once the formatting is finished you will have something like this:


*this new partition is where your XP installation will go, so take note of it's location, in case there are multiple partitions on the drive (there will now be atleast 2).


Step 2 - Install XP:


wait while XP installs (I won't go into detail, there are many tutorials on this, and it is reasonably straight forward)


Now that XP has installed, it attempts to boot for the first time... all goes fine, video settings, networking, then the lovely welcome screen as usual.

You restart, expecting a boot loader screen... followed the tutorial this far, and now you seem to only have XP... well not quite, I wouldn't leave you hanging without giving you a proper dual boot.


here lies the only real issue with installing XP after Vista, but it's a quick fix if you have your Vista CDs/DVD handy.

The problem is that Vista and XP use different boot loader utilities in the MBR (Master Boot Record) of your hard drive. XP does not recognize Vista, but Vista will recognize XP, so we need to remove the boot loader that XP just put in with the old Vista boot loader. So restart once more, but this time with your Vista disc in the drive.

Step 3 - Fix Boot Loader:


Vista will load the GUI files, and then display the loading splash screen.

-Click "Next" on the first screen
-Once the "Install Now" menu (do not click Install Now) choose "Repair Your Computer":


-You will be prompted to choose the OS to repair. Don't worry if Vista is the only OS that shows up, even after a search.


click "Next"

-I realize there is a "Fix Startup" option, but it's been my experience that it doesn't work, and this method will.
-choose to open a "Command Prompt":


type in the command prompt the following 2 lines (separatly):
Bootrec.exe /fixMBR
Bootrec.exe /fixBoot


-close the prompt and restart
-now that Vista controls your boot loader, the process is mostly finished, now we need to inform Vista that XP is installed, as to enable the boot loader selection screen.
*There are programs such as VistaBootPRO that will do this for you, but it requires .NET framework, etc, so I did it the manual way.


Step 4 - Edit boot.ini:
In Vista, the boot.ini is not editable directly, as the file itself is hard to locate, so we will be modifying it through "Boot

Configuration Data Store Editor" bcdedit.exe:
(Just as an explanation, the loader type for XP is an NT Loader, hence the use of ntldr)

-first open a command prompt with administrative privilages (right-click and choose "run as administrator")
*Note the following 2 answers from bcdedit for each item are acceptable:
"The Operation Completed Successfully"
"The Specified Entry Already Exists"
Be sure to type each line carefully (replace C in the first line with the drive containing your Vista installation):
bcdedit –set {ntldr} device partition=C:
bcdedit –set {ntldr} path \ntldr
bcdedit –displayorder {ntldr} –addlast
bcdedit -set {ntldr} description "Microsoft Windows XP"

The completed bcdedit file should resemble this:


-This will correctly add XP to your boot sequence, and even name it properly instead of "Earlier Version of Windows"
-the displayorder line also allows the entry to be visible under the advanced settings of your computer properties.


Vista is the default boot, if you wish to change this to XP it can be done by setting {current} to addlast, or under the computer

-> properties -> advanced settings.

If all done properly, XP and Vista will dual boot properly!


Regards,

Tarun.Reflex

jaiswal.tarun@gmail.com


SATA hard drives have become more and more appreciated tending to substitute the IDE drives due to the increasing speed they offer. Motherboard manufacturers started to implement the new standard years ago, when the technology was young and expensive. Now, as the SATA HDD prices have lowered to a level where anybody can afford to choose a SATA enabled HDD instead of an IDE one, a great migration has been observed among the common computer users.

They choose to install Windows and applications on SATA drives because they provide more speed which determines the system to run smoother. Thus, for those owning older mainboards with SATA support an extra step is required while attempting to install Windows XP. Windows XP does not provide drivers for all the SATA controllers, therefore, during the installation procedure, the user must insert a floppy with the drivers that came in the package along with the motherboard.

Not a big deal, not much effort, but the funny thing is that a great number of people passed on their floppy drives. Under these circumstances, no floppy means the impossibility to install Windows XP on SATA (on some mainboards). The result? The installation guide simply won’t detect the SATA HDD.

People that were happy they got rid of the old removable drive have now motives to worry. Some may reconsider buying new floppy drives for their computers. Even if I wrote in a precedent article about the utility of the floppy drive, I do not encourage spending your money buying back an obsolete piece of hardware. I will present you a method to avoid this inconvenient by doing a software trick.

Let’s take it slow. Where is the problem? We have a driver problem strictly because the SATA driver we need does not come embedded in the Windows XP installation package. What if we add the driver by ourselves before installing Windows?

What ingredients are involved in this operation? The original Windows XP Installation CD, a freeware application named NLite and a blank CD. Moreover, we need the drivers for the SATA controller provided by the manufacturer. In case you did not find any floppy inside the motherboard package or you cannot locate them on the mainboard installation CD, you can consult the manufacturer’s website to download the latest versions. To do the trick I have been talking about, it is assumed that you already have a Windows installed on an IDE drive. In case you don’t, pay a visit to a friend and ask him to let you use his computer. It won’t take too much time, I guarantee.

So, download the drivers and unzip them (in case they come archived) in a desired location. Then download and install the Nlite application. When you start the Nlite application, you will be asked to provide the location for the Windows installation package. Insert the genuine Windows Installation CD into the CD drive and, inside the application, select the CD drive letter.

To insert the SATA drivers within the installation package, you need to have it saved on the HDD. Hence, when the warning window appears click OK and select the destination folder for the files to be saved. Make sure that the destination partition / HDD has enough space to store the contents of the installation CD.

I tested a Windows XP Home Edition and it seems that it required about 566 MB. Immediately after you have chosen the destination folder, the application will start copying the Windows installation files. When finished, it will display some version information regarding the newly copied Windows Installation Package.

Now, click next twice until you get to a screen where you get options sorted in 4 categories: Integrate, Remove, Setup, Create. We are interested in the integration procedure, therefore select the Drivers button and click next. From the next menu window, click Import and select multiple drive folder option from the drop down menu. This option permits you to browse to the location where the downloaded drivers are found.

Select the containing directory and click next. You will get a list with the available drivers (in case there are more than one) or simply one driver. Select it (them) and click next. Now the application will ask for the permission to start the integration procedure. Choose Yes and wait for the drivers to be inserted into the installation package.

Review image Review image Review image Review image Review image
Review image Review image Review image Review image

With problematic driver being included in the installation package you can install Windows XP on your SATA HDD…but…the installation package is on the HDD. You need a bootable CD in order to start an installation. Don’t worry, once the installation package has been adorned with additional user selected drivers it can be transformed into a bootable disk image and later burned on a CD. To encapsulate the installation into a ISO image use the same Nlite application.

Open it, make sure the HDD installation folder is selected and click next. Select “Last session” preset and click next again. Now from the options menu choose Bootable ISO and click next. In the following window, make sure that the mode is set to “Create Image” and click Make ISO. A destination folder is required where the resulting ISO image will be saved. Once the image saving process finished you have the freedom to burn it on a blank CD with whatever you favorite CD burner software may be.

Review image Review image

The new CD will be the twin copy of the Windows Installation CD but with one difference, it includes the SATA driver.

Link Unit By Google

Search

Subscribe via email

Enter your email address:

Delivered by FeedBurner

Ads By Google

Smart Subscribers

A Note About Comments.

Your response is greatly valued so go ahead and say it! I read all comments and also try to answer each one. Your views are always welcome and every comment is a kind of update so don't hesitate.

Google Ads

Amazing Arts

Amazing Arts
Amazing Arts

Free Text Books

Textbooks.com- Free Shipping- 125 x 125- Red Circle Background

Find Love

Find Love Online! Matchmaker.com