Windows Help Center

Your One Stop Blog for all Windows XP and VISTA tricks,tweaks ,hacks and much more.

Followers

Ads By Google

1000 Awesome Things About India

Blog Stats

recent Tricks

Ads By Google

Link Unit By Google

Categories

Register for Free

Google Search

Showing posts with label virtual PC. Show all posts

First thing you need is to download the Desktop install ISO from the Ubuntu site (http://www.ubuntu.com). You can skip right to the download mirrors page at http://www.ubuntu.com/getubuntu/downloadmirrors if you want to save a few mouse clicks.

Once you get it downloaded fire up Virtual PC, and create a new machine. If you are not familiar with VPC, see my step by step instructions for creating a machine at http://arcanecode.wordpress.com/2006/09/20/virtual-pc-step-by-step/ Make sure to pick “other” as the OS type. I used 512 meg of ram because my system has 2 gig, but if you have less you can get away with 256 meg of ram for the Ubuntu Virtual machine.

Fire up your new virtual machine, and use the option in the CD menu to “Capture ISO image”. Point the image at the desktop iso you just downloaded.When it starts, immediately press the down arrow, so that “Start Ubuntu in Safe Graphics Mode” is highlighted.

When 7.04 was released, the new kernel had issues with the mouse emulated by Virtual PC. To be blunt, the mouse just didn’t work. However, several work arounds were found. The easiest was brought to my attention via comments on the blog, the i8042.noloop option. That’s what we’ll implement, so we can use the mouse during the “live mode”.

Hit the F6 key, for Options. When the line appears, at the very end type in a space (if there’s not one after the two dashes) then i8042.noloop . Your screen should look something like this:

u710_001

Press Enter to start the launch process. Be patient, it takes quite a while. Once it’s finally up though, you’ll see this screen:

u710_002

Double click on the Install icon to begin the install.

On the first screen, below, you are welcomed and asked about a language. Pick your language and hit Forward.

u710_003

Now pick your time zone, since I’m in the Central zone I picked Chicago as a city in my time zone and clicked Forward.

u710_004

No it asks about keyboard layout, pick your keyboard if yours isn’t US English, then press Forward.

u710_005

Ubuntu will crank and grind for a minute, then you’ll see this dialog asking about your disks. Just take the defaults and click Forward.

u710_006

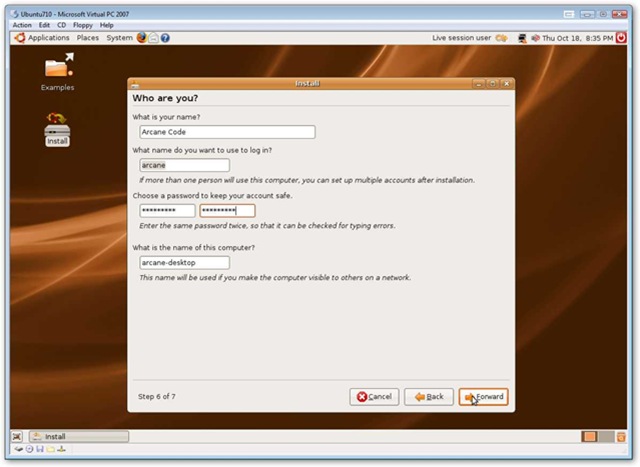
Time for a little personal info, give your name, a login id, enter the password you want to use, and what you want to name the “computer”. When done click Forward.

u710_007

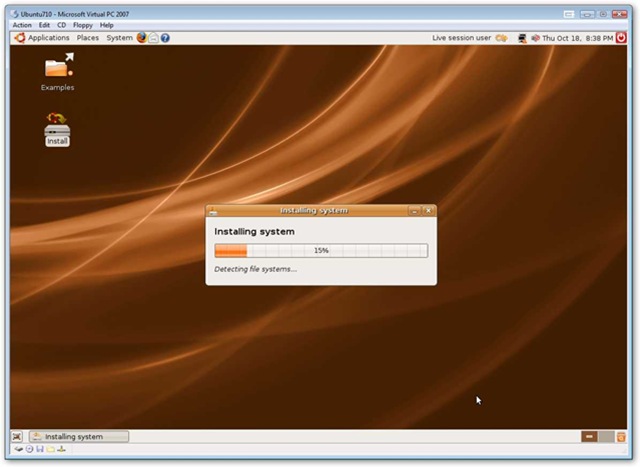
OK, you’re almost ready to start the install process. Look this over, if everything looks good just press the Install button and we’re off to the races.

u710_008

Did I say races? Well, turtle race might be more like it, the install runs pretty slow, so get some coffee, or maybe a second bowl of ice cream if you’re doing a late night install.

u710_009

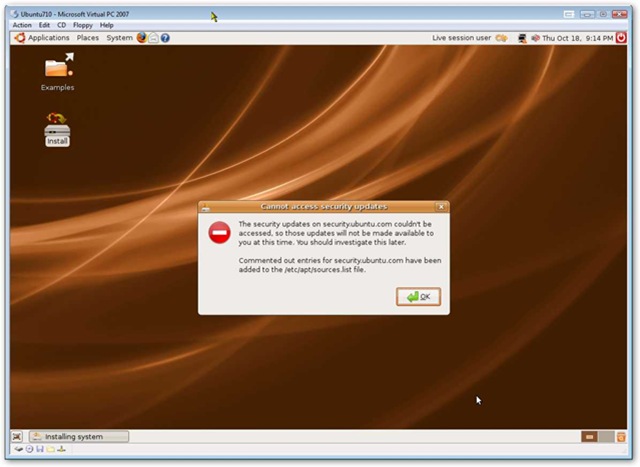
I did encounter one error during the install. You may see this as well, but you can go back later and correct this through the normal updates process.

u710_010

Now Ubuntu will finish, and ask if we want to reboot. Tell it no, then reboot by shutting down by pressing the red shut down icon in the very upper right of the Ubuntu window.

OK, you’ll have to be very quick with this next step. Remember the mouse issue? We’ll still need to fix it. First, boot the new machine, after clicking on CD and releasing the ISO if it’s still held. Now when you see the words “Grub loader” hit the Escape key. If you were fast enough, you’ll see this screen.

u710_012

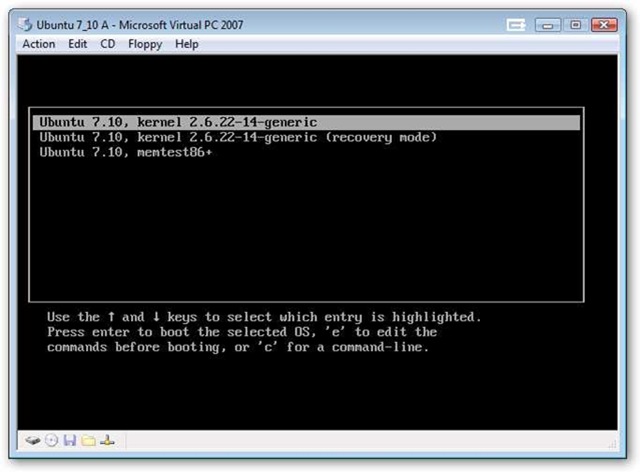
With the line you see selected, press the “e” to edit the line. Now a new screen will appear.

u710_013

Move the highlight down one to the Kernal line, and press “e” to edit that line. When the new screen appears, you’ll need to add two dashes, then the i8042.noloop command. Your screen should look like this:

u710_014

Press Enter, then when you are returned to the screen with “kernel…” on it, make sure the kernel line is still highlighted and press b to boot.

Once booted, login using your user id and password. When Unbuntu is up, it’s time to fix the mouse issue once and for all. Click on Applications, Accessories, Terminal. When the terminal window appears, type in:

sudo gedit /boot/grub/menu.lst

u710_015

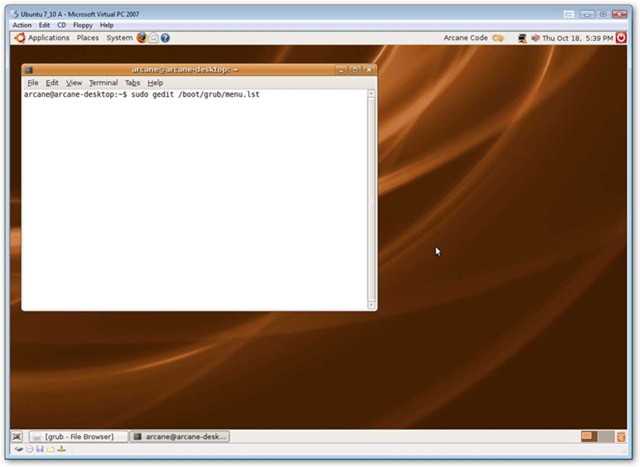
When you press Enter you’ll be prompted for your password, enter it. An editor should appear. Scroll down to the very bottom of the text and find the line that begins with “kernel”. Add the – i8042.noloop to the end of the line, as I’ve shown below. (Note I have highlighted the line to make it easy to see, yours won’t be normally highlighted in your session.)

u710_016

Save the file and exit the editor and the terminal window. When you next reboot, you should be able to just login normally, and the mouse should work.

And there you go, Ubuntu 7.10 up and running, complete with mouse, under Virtual PC 2007.


My sincere thanks to Arcane Code Blog.


You've taken the leap into Windows Vista, but once in awhile, your heart yearns for the classic features and functionality of XP. Maybe you've got software that doesn't yet work in Vista, or maybe you just want to see how a web site looks in Internet Explorer 6. You could dual-boot XP and Vista, but switching between operating systems in that setup takes too much time.

Instead, quickly toggle between Windows versions with an XP virtual machine running inside Vista using the free Virtual PC 2007. Here's how.

What you'll need

  1. A Windows XP setup disc with a license.
  2. The free Virtual PC 2007 download.
  3. About an hour, depending on how fast your computer is.

Now, lots of lifehackers say that other virtualization software, like VMWare or Parallels for Windows is better or faster than Virtual PC. That may well be true, but Virtual PC is free, which is just cheap enough for home use. Virtual PC is best suited for casual users who fancy an occasional foray into an older version of Windows.

This particular article is for running an XP virtual machine inside Vista, which is almost guaranteed to work reasonably well. Here's my logic: if your PC is beefed up enough to run Vista, it'll run XP just fine as a virtual machine.

Virtual PC can be used to run other operating systems inside Windows XP, also - but be warned: without a fast physical machine with lots of RAM, your virtual machine may be slow too.

Create a new XP Virtual Machine

Once you've got Virtual PC 2007 downloaded and installed and your XP disc at the ready, from Virtual PC's Action menu, choose "New Virtual Machine Wizard" and you're off. Within the VM Wizard, you'll set how much RAM to allocate to the XP virtual machine, and you'll also set up a new Virtual Hard Drive with a size you set that XP will use to store data.

The Virtual Machine Wizard, like most Windows wizards, is easy enough to work through.


Then

Install Windows XP

Now, you've got to install Windows XP onto your new virtual partition. If you've ever set up XP from scratch before, this'll be old hat.

You'll be prompted to format a "new partition," which is the virtual hard drive you set up earlier. Also, you'll be asked to set XP's date and time and other regional settings. The first time you click inside the XP VM, Virtual PC will attempt to "capture" your mouse pointer. Once it's inside the VM, you won't be able to move it out of the window without using a special key combination (Right-Alt, by default.) Here's the initial VPC prompt about mouse capturing:


This mouse pointer capturing business is really annoying, especially for someone used to using VNC to remote control computers. Happily using some extras for VPC, we can stop the Right-Alt madness. More on that later.

I completed XP setup in about an hour on my Acer laptop. Your mileage, as they say, may vary.

Run your XP virtual machine

Once setup completes, XP will "reboot" and start running inside a window on Vista. Here's what that looks like:


Now, there are tons of virtual machine settings and properties you can fiddle with to your heart's content. But before you do that, be sure to install the Virtual Machine Additions to your XP VM for a few must-have extras.

Install the Virtual Machine Additions

To get extra VPC features like sharing the mouse and folders between guest OS and host, start up your XP VM, and from the Action menu, choose "Install or Update Virtual Machine Additions" (the key command is Right-Alt-I). VPC will go through its paces and prompt you to reboot the XP VM.Once VM Additions are installed, you can move your mouse between your XP VM and Vista host without having to press Right-Alt to free the pointer. Additionally, you can share folders from the host PC to the VM. Check out the Settings area to do that.

While Virtual PC 2007 isn't the best virtualization software ever, it's pretty damn good for free, and it may be just the thing you need for a little retro XP action, fast.

Link Unit By Google

Search

Subscribe via email

Enter your email address:

Delivered by FeedBurner

Ads By Google

Smart Subscribers

A Note About Comments.

Your response is greatly valued so go ahead and say it! I read all comments and also try to answer each one. Your views are always welcome and every comment is a kind of update so don't hesitate.

Google Ads

Amazing Arts

Amazing Arts
Amazing Arts

Free Text Books

Textbooks.com- Free Shipping- 125 x 125- Red Circle Background

Find Love

Find Love Online! Matchmaker.com